
The Family Archive: Curating Memories into Beautiful Photo Books
- Alexandra Duprey
- Sep 3, 2025
- 8 min read

Updated: Sep 4, 2025
One of my favorite pastimes when I visit my grandmother is spending an hour or two leafing through her collection of photo albums. While they span decades of family life, I always find myself drawn to the ones from the 1950s, when my grandparents were high school sweethearts, then soon after, newlyweds and then young parents. The albums from the ’60s, with their fun psychedelic covers, are another favorite because my mom's childhood is documented in them (and you should see my grandmother's bouffant!) Even though the memories in those pages aren’t technically mine, the people and stories they contain are apart of my shared family history-- the ritual of looking through them every visit, grounds me and connects me to my roots. That’s the gift of a printing your photographic memories: they become a part of the family archive, connecting generations through images and stories.
In an age when most of our photos live on phones and hard drives, creating tangible books allows our children, grandchildren, and even great-grandchildren to hold our lives in their hands!!
I have been making photo books of our family vacations for years, and have just started to create seasonal books to house my personal work on film as well. In this article, I will be sharing my creative photo book making process, the companies that I have used and loved, some budget-friendly options for printing, and thoughtful tips for creating a photo book that doesn’t just collect pictures, but truly curates the story of your family’s life and adventures.

Where to begin when Designing your first photo book?
1. Begin With a Story
Before you upload a single photo, think about the story you want to tell. Is it a summer road trip? A year in your family’s life? The baby years of your youngest? Or maybe some favorite portraits from a recent professional family photo session? Defining the story of your book will shape how the images flow and ensure it feels cohesive rather than overwhelming.
I personally love to keep things as simple as possible. I typically create a book for each season (an example would be "Summer, 2025") and for each family trip ("Vermont, 2024"). This keeps the number of images I have to sort through to a minimum and makes it much less difficult to choose which I put into the book. This leads me to my next pointer!
2. Curate With Care
It’s tempting to include every photo, but the best books are edited with intention. This process, called "culling" by professional photographers can be very challenging!! Especially when you have many wonderful images and memories to work with. My advice is to choose images that you can feel in your gut or that make you smile-- the ones that give you an immediate, undeniable reaction.
I also like to make sure that I am featuring both the highlight moments and the quiet in-between moments and detail shots—your kids skipping rocks at a creek, a late-night card game, or the pile of shoes by the door of a rented beach house. Think variety: sweeping landscapes, portraits, and quirky details.
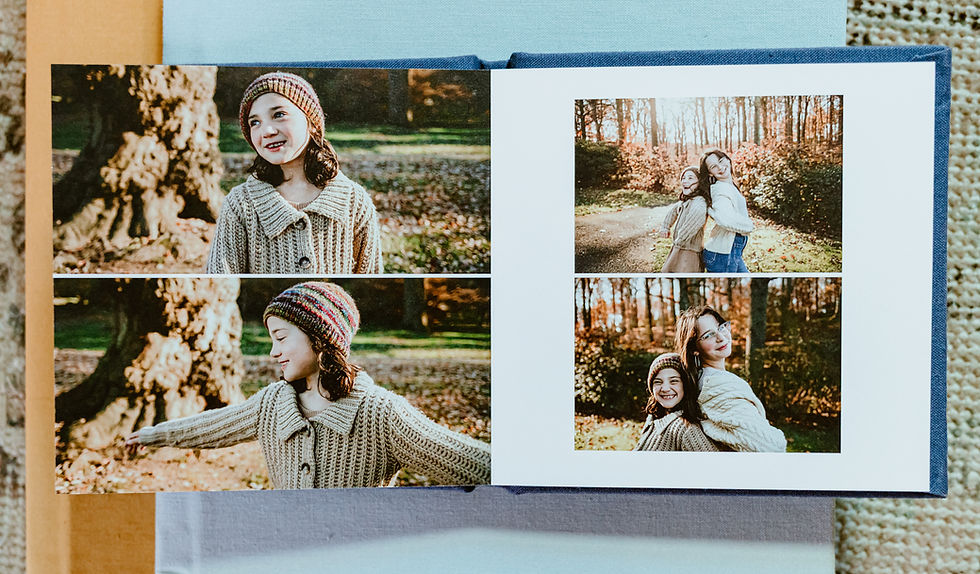
Here are few examples of spreads from our New Hampshire Photobook to give you an idea of my thought process when putting together a collection of images from a vacation.
For a simple, side-by-side layout, I like to group images with simular colour profiles meaning warm images with other warm images and cool images with other cool images. Below is an example of a warm toned photo spread. Both photos were taken at golden hour on a family hike:

The following photo spread contains photographs taken in two different locations. The first (25) was taken of Sloane counting quarters at a landrymat and the second playing a public piano while we were waiting for a table at a restruant. Both pictures have a theme of waiting/boredom and feature cool tones and a simular colour scheme:

The following spreads are an example of how I use different types of images (details, wide angle landscapes, and portraits) to add texture to the book. The first image (57) was taken in the Areial Tramway on the way up to the Canon Mountain summit. Note that it is not a particularly smiley picture of my children, but it is nonetheless one of my favorites from the trip. The second image (58) was taken through the scratched glass on the tram itself, looking down the mountain.

The following spread includes an image taken on the rim trail of Canon Mountain (59) and a view of the tram as it descends down the mountain to collect more passengers (60).

3. Organize for Flow
For vacations, chronological order often makes sense, allowing the book to feel like a journey. For family life, seasonal chapters or milestone markers (birthdays, first day of school, holidays) give structure. But don’t be afraid to bend the rules if a favorite image deserves a special spot.
4. Let Photos Breathe
White space is your friend. A mix of full-bleed spreads and smaller groupings gives rhythm and visual interest. Overcrowding pages can distract from the story you’re telling. Allowing space around the images elevates the whole design and makes the book feel timeless. I truly love and reccomend single page spreads for this reason!
5. Add Words (Even Just a Few)
A photo may be worth a thousand words, but even a few sentences can add rich context. Include dates, locations, names, or even little quotes your kids said. Years from now, those details will spark laughter and nostalgia—just like the tiny scrawled notes on the backs of my grandmother’s photos.

Many photobook design tools let you create space for text that prints neatly, but you might also consider writing directly in the book with an archival pen for a personal, lasting touch. A fellow photographer friend of mine likes to include her children in the process of creating their family photobook. Her kids love seeing their own memories and impressions reflected in the pages, making the book feel even more personal and meaningful to them.
6. Preserve the Everyday
Don’t limit yourself to the posed portraits or big moments. Often, the images that mean the most later are the ordinary ones—the bedtime snuggles, messy ice cream cones, a quiet morning at home. These are the scenes that tell the truth of your family’s story.
As an example, the spread below is one of my favorites from our camping trip photo book. It might be the colour of my husband's acidic green shirt, his concentrated expression as he brushes our son's teeth, or the mirrored effect in his glasses (20). These were definietly not posed, I just wanted to remember this small part of our trip.

7. Choose Quality That Lasts
A family archive deserves to be durable. Choose a photo book service that offers archival-quality printing, sturdy binding, and covers that will hold up to years of hands flipping through. I have used all three of these companies to print our family memories.
Each has its strengths—so think about what style best fits the story you want to tell.
Mpix is known for its professional-level print quality. This is the company I usually order my personal photo prints from. I have ordered linen covered photo books from them and the quality is impeccable. Highly reccomend!

Shutterfly offers a wide range of templates and customization options, which is great if you like creative layouts-- they are also very affordable. I appreciate how cheap they are (especially when they are running a special deal or you find a coupon code!) I also appreciate that thier photo books have wipeable covers and glossy pages which hold up well to grubby fingerprints. I usually use Shutterfly when I am not picky about aesthetics, and want a larger size book.
Keep in mind: Shutterfly has a bunch of add-ons that can jack up the price of your photo book. Those glossy pages I love? I pay extra for them. What I won't pay extra for is removing the shutterfly branding on the back page of the book-- it just doesn't bother me all that much. Both Mpix and Artifact Uprising do not include and identifiable branding or logos in thier photo books.


Artifact Uprising is ideal if you love minimalist, modern design with high-end finishes like linen covers and thick matte paper (thier books are really beauitful). I love the simplicity, the sturdiness of the pages, and gilt titles on thier Everyday Photo Books (the design process of which is outlined above).


8. Make It a Tradition
One book is wonderful; a series becomes a family legacy. Try creating one each year, or after major trips. Over time, you’ll build a collection that reflects the seasons of your family’s life—a tangible reminder of how your story has unfolded. I am happy to invest in a photo book of our memories from each vacation-- it is something that I actually put into our vacation budget. I also enjoy the process of coming home with a SD card full of pictures and a several rolls of film and slowly curating these memories into a book-- it really helps me to reflect on our trip and remember all the fun things we did as a family.
Closing Thoughts
Someday, your grandchildren might sit in a cozy living room, paging through your albums, marveling at the collars of your shirts, your bygone, of-an-era, hairstyle, the make of the family car, your vacations, holidays, and everyday life. They may not remember those moments firsthand, but they’ll feel connected to them-- because you took the time to preserve them and you are a part of them. A photo book is more than a keepsake; it’s your chapter in the family archive.
If you are interested in learning about other ways to preserve your family archive, you can read about my love for Chatbooks HERE (a super budget friendly option for making photobooks straight from your camera roll) and Mootsch's monthly photo printing subscription (perfect for those that prefer shoe boxes full of printed photos) HERE


Thank you for a delightful article that describes the life of a family working as potters. The beautiful photos are a compliment to the written word.